Building a RAG-Powered AI Chat Agent with LangChain and Node.js
/ 6 min read

Large Language Models (LLMs) are incredibly smart, but they suffer from one major limitation: they only know what they were trained on. If you want an AI to answer questions about your private company data, specific student records, or internal documentation, you need a way to feed it that context.
This is where RAG (Retrieval-Augmented Generation) comes in. Instead of retraining a massive model, RAG allows your AI to look up relevant information from an external database dynamically and use that knowledge to formulate an accurate answer.
In this guide, we will build a beginner-friendly, RAG-powered AI agent using LangChain, LangGraph, and Node.js. We will break down how to load and split data, create embeddings, set up a retrieval tool, and hook it all up to an autonomous agent.
The Core Concept: How RAG Works
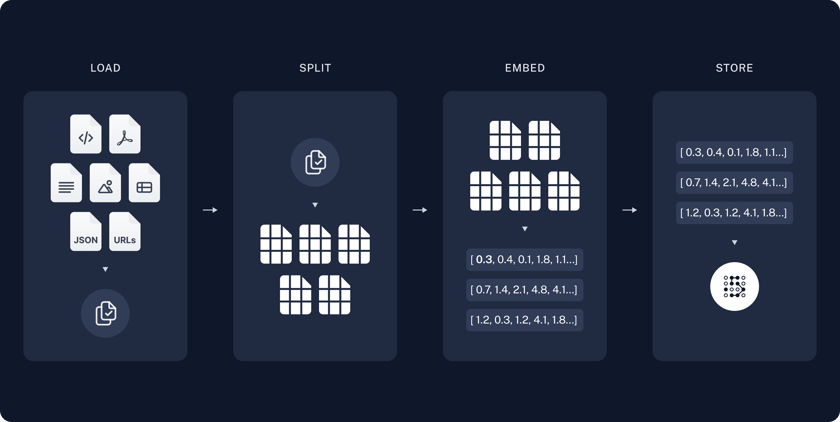
Before jumping into the code, let’s review the foundational concepts:
- Text Splitters: LLMs have limits on how much text they can process at once (context windows). Splitters break massive documents down into smaller, bite-sized “chunks.”
- Embeddings: Computers don’t understand words like humans do; they understand math. Embedding models convert text chunks into long arrays of numbers (vectors) that capture the semantic meaning of the text.
- Vector Store (Retrieval): A specialized database that stores these vectors. When a user asks a question, the system searches this database for chunks that are mathematically “closest” in meaning to the query.
- Tool Calling & Agents: Instead of just running a static search, an Agent is powered by an LLM that can dynamically decide when it needs to use a specific tool (like our search tool) to look up information.
Step-by-Step Code Walkthrough
Below is the complete implementation of a RAG system designed to parse, store, and query student records using LangChain.
1. Project Setup
We begin by setting up a new Node.js project. We will install the necessary LangChain packages, including @langchain/classic for our in-memory vector store and @langchain/langgraph for creating the agent.
pnpm initpnpm add @langchain/core @langchain/openai @langchain/community @langchain/textsplitters @langchain/classic @langchain/langgraph dotenv zodtouch agent.jstouch Student-data.csvtouch .envPlease make sure you have generated your API keys from OpenAI for the chat model and embedding model and saved it in the .env file.
OPENAI_API_KEY=[!NOTE] Why
@langchain/classic? In modern versions of LangChain.js, the legacyMemoryVectorStorehas been moved to@langchain/classicto keep the core library lightweight. Importing it from@langchain/core/vectorstoresor other legacy paths will result in aSyntaxError.
2. Document Loaders and Splitting Data
In a real-world scenario, your data might live in PDFs, Word docs, or on the web. LangChain provides loaders for almost everything. Here, we simulate a “Database Loader” by reading a simple Student-data.csv file, splitting it into chunks, and loading it into our in-memory vector store.
import { CSVLoader } from '@langchain/community/document_loaders/fs/csv';import { RecursiveCharacterTextSplitter } from "@langchain/textsplitters";import { MemoryVectorStore } from "@langchain/classic/vectorstores/memory";import { OpenAIEmbeddings } from "@langchain/openai";
// 1. Load and split the CSV documentsasync function loadAndSplitDocs(filePath: string) {  const loader = new CSVLoader(filePath);  const docs = await loader.load();
  const splitter = new RecursiveCharacterTextSplitter({    chunkSize: 1000,    chunkOverlap: 200,  });
  return splitter.splitDocuments(docs);}
// 2. Initialize Embeddings and Vector Storeconst embeddings = new OpenAIEmbeddings({  model: "text-embedding-3-small",});
const splitDocs = await loadAndSplitDocs("./Student-data.csv");const vectorStore = new MemoryVectorStore(embeddings);
// Load the split chunks into the vector storeawait vectorStore.addDocuments(splitDocs);
We use the RecursiveCharacterTextSplitter to ensure our data chunks fit comfortably within the AI’s memory. Once split, the documents are embedded as vectors and stored in vectorStore, ready for similarity searches.
3. Creating the Retrieval Tool
An agent needs hands to interact with the world. In LangChain, those hands are called Tools. We need to create a tool that allows the LLM to search our vector store.

import { tool } from "@langchain/core/tools";import { z } from "zod";
const retrieveTool = tool(async ({ query }) => {  const retrievedDocs = await vectorStore.similaritySearch(query, 3);  const mergedDoc = retrievedDocs.map((doc) => doc.pageContent).join('\n---\n');  return mergedDoc;}, {  name: 'Retrieve',  description: 'Retrieve student records, grades, teacher feedback, and recommended improvements based on the query.',  schema: z.object({    query: z.string().describe('The query to search for student information')  })});
We define a custom tool named Retrieve. The description and schema properties are crucial: the LLM reads this description to understand exactly when to use the tool and what parameters (validated via Zod) it needs to pass. When executed, it performs a similaritySearch and returns the top 3 closest matching records.
4. Initializing the LLM and Agent
Now it’s time to build the brain of our operation. We are using OpenAI for our LLM as it supports vector embedding generation and chat capabilities. We use gpt-4o-mini because it is fast, highly capable, and cost-effective.
import { ChatOpenAI } from "@langchain/openai";import { createReactAgent } from "@langchain/langgraph/prebuilt";
const llm = new ChatOpenAI({  model: "gpt-4o-mini",  temperature: 0,  maxTokens: 1000});
const agent = createReactAgent({  llm,  tools: [retrieveTool],});
We instantiate ChatOpenAI using gpt-4o-mini. Setting the temperature to 0 makes the model focused, analytical, and highly deterministic—exactly what you want for factual data retrieval. We then pass this LLM and our retrieveTool into createReactAgent, giving the model the reasoning capabilities required to run agentic loops.
5. Executing the Chat Agent Call
Finally, we prompt our agent with a complex analytical question that requires browsing through our student database.
const agentResponse = await agent.invoke({  messages: [{    role: "user",    content: "What is the average grade of students in the 'Engineering' department?"  }],  configurable: { thread_id: "analytics_session_1" }});
console.log(agentResponse.messages[agentResponse.messages.length - 1].content);
Instead of calling the LLM directly, we invoke the agent. The agent reads the user’s prompt, realizes it doesn’t know the student grades natively, triggers the Retrieve tool to search the vector store, and synthesizes a perfectly tailored response. The thread_id keeps track of the conversation context for future interactions.
We can execute the project with the following prompt
node --env-file=.env agent.jsReferences
Here is a collection of reading materials you can refer to learn more about RAG chat agents:
- LangChain Documentation
- RAG from Scratch with LangChain.js
- Build a RAG agent with LangChain and Supabase
- Code Repository
Conclusion
We’ve just built a fully functional basic RAG agent! By combining LangChain components like text splitters and embeddings with LangGraph’s agent workflows, you have moved past static prompt-response setups and created an application capable of dynamically retrieving data to solve real-world problems.
From here, you could scale this up by replacing the temporary MemoryVectorStore with a production-grade database like Pinecone, Chroma, or PGVector, and hooking it up to a live user interface!
Have a question, feedback, or simply want to build production-grade AI agents? Shoot me a DM and I’ll do my best to get back to you.
Thank you!
I am available for new projects. Let’s collaborate and build something great together.